Microcontroller ATmega8535 Programming And Interfacing
This resource contains introduction to micro-controller Atmega8535 and complete information on programming and interfacing LCD, key board with micro-controller ATmega8535. It contains full description on interfacing with suitable circuit diagram and pin configuration.
Microcontroller ATmega8535 Programming And Interfacing
Introduction to ATmega8535 Microcontroller:
ATmega 8535 is basically from atmel's microcontroller family with 8kb flash memory. This microcontroller works at 16MIPS. Easy to configure as well as program. Advantages of this microcontroller are there are so many applications of this microcontroller in practical work. You can program this microcontroller with AVR programmable board. You can also buy the readymade programming board or learning kit on internet or at your end. It is easily available on internet because this microcontroller is very popular in market for projects and other applications.
Making of programming board is also possible but if you are new with microcontrollers and if you do not have any past experience about microcontroller so I suggest not to go for making the programming board it is not too easy and it takes much time to make.
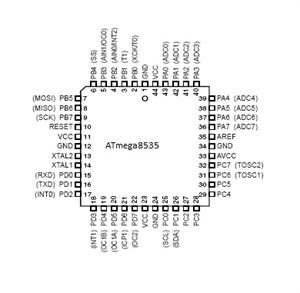
Pin Diagram of ATmega8535:
ATmega8535 microcontroller is 40 pin IC. Pin configuration with suitable labels of microcontroller 8535 is as shown in bellow figure. 
Architecture ATmega8535:
Figure bellow shows overall block diagram and architecture of ATmega8535 microcontroller.
Architecture of ATmega8535 consist of several blocks in which some blocks are important such as, ALU (Arithmetic Logic Unit), EEPROM, General purpose register, Program counter, Flash Memory, Instruction Register and Decoder, Input Module, Interrupt Unit, Comparator, Status and Control.Some Examples to Program 8535:
LCD Programming:
#include
#include
#include
int main(void)
{
lcd_init();
while(1)
{
int i;
for(i=1;i<3;i++)
{
lcd_gotoxy(i,0);
lcd_string("Pranay");
delayms(1500);
lcd_clear();
delayms(10);
}
}
}Running LED Program:
#include
#include"delay.h"
int main(void)
{
PORTC=0X00;
DDRC=0XF0;
unsigned char x;
while(1)
{
for(x=0x10;x!=0x00;x<<=1)
{
PORTC=x;
delayms(300);
}
x=0x10;
}
}Interfacing ATmega8535:
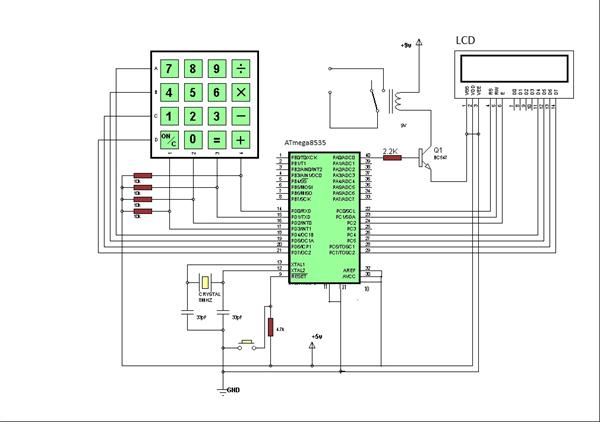
Interfacing LCD and key board with ATmega8535 microcontroller is as shown in figure bellow. For interfacing ATmega8535, you have following components.
1)LCD
2)Keyboard
3)ATmega8535 microcontroller
4) 10K resistor (4)
5)2.2K, 4.7K resistor
6)30pf capacitor (2)
7) 8MHz Crystal Oscillator
8) BC547 Transistor
Now interface circuit as shown in bellow figure on multipurpose PCB. Before implementing components on PCB check the whole circuit on breadboard so that you can remove errors if any.